


How to make a face mask? Step by step DYI instructions
You may have already seen our blog post about sewing face masks with a filter pocket. At the time, we said that although we had been making masks without stopping since mid-March, we were not planning to sell them. We give the masks that we are making free of charge where they are needed the most (in our stories you can see nurses “wearing the Rvbbit”), and add them to your orders, too. However, we know that some of you would like to make the masks yourselves, so we will show you how to sew a face mask step by step. The instruction on how to sew a face mask is based on our sewing method, fully accepted by people working in hospitals. Our reusable mask with filter pocket has the same measurements as professional surgical masks, so you can use our cut without fear.
Because it’s impossible to responsibly explain how to sew a face mask in a few sentences, we divided our article into a few parts:
- How to sew a reusable face mask – materials needed
- How to sew a face mask – step by step DYI instructions
- How to put on and remove a face mask
- How to wash and sanitize a face mask
We highlighted each part in such a way that you can easily find the information you need the most. However, if anything is not clear to you, leave a comment or send us a message.
How to sew a reusable face mask – materials needed
You will need the following things to sew the reusable face mask:
- low-weight cotton
- a wire to make the upper part adjustable
- scissors or pins
You may be wondering why there is no elastic in the materials we listed. We don’t use it because the vast majority of elastics available won’t last in high washing temperatures. When we were making disposable masks, we sewed in flat elastics – however, when we washed the same elastic at 90°C (194°F), after the third wash the elastic broke and the masks couldn’t be put on properly. As a manufacturer of lingerie, we’ve probably learned about all kinds of elastics by now, so we knew that since we’re sewing masks mostly for health professionals, they must survive sanitizing at 90°C (194°F) without any damage. And that's why we decided to add strings tied at the back of the head.
So can you put an elastic instead of strings in your mask? You can. But remember that the durability of such a mask will be lower than the durability of a mask entirely made of cotton.
And when it comes to cotton: we recommend choosing a low-weight material, for example thin cotton, because the thicker the material is, the harder it is to breathe through it. If you have cotton at home and you wonder if it will be good for making a mask, fold it in half and put it on your face – and then check if you can breathe freely through it for at least a few minutes. The masks in our studio are sewn from pure Polish cotton without any admixtures (its weight is 140). The second layer, which forms pockets, is sewn from thin cotton lawn (batiste).
How to sew a face mask – step by step DYI instructions
We divided the process of sewing a mask into a few simple steps for you to follow:
1. CUT
Cut according to the straight thread – if, like us, you use cotton with a pattern, put the form perpendicularly to the pattern, not diagonally. This is important because the filter pockets cut diagonally will probably “wavy” during sewing. In this way you cut three elements:
- the front of the mask, a 16 cm x 17 cm rectangle
- the back of the mask (filter pocket) – two 10 cm x 17 cm rectangles
- 2 straps – two 2.5 cm x 80 cm rectangles – you can use the ready-made trimming (you can also replace the straps with an elastic)
The rectangle that we cut out for this tutorial has cuts at the sides. They will be helpful when making overlaps, so you can mark them on the cut- out piece of cotton. The first cut is placed at 4 cm from the top edge of the mask. As you can see in the picture, the distance between the cuts is 1 cm – 2 cm – 1 cm – 2 cm – 1 cm.

2. STITCH THE HEMS
When all the elements are cut out, it's time to secure the hems. To do this, stitch:
- straps on both sides
- rectangles forming a filter pocket – on one side

3. SEW THE RECTANGLES TOGETHER
Arrange the rectangles in a way that the hems of the front meet the hems of the lining – place the fabrics so that their face sides touch each other. Then sew the hems together, as in the pictures below – in this way a filter pocket will be formed at the back:

When you finish with the stitching, turn the fabric to the face (right) side.
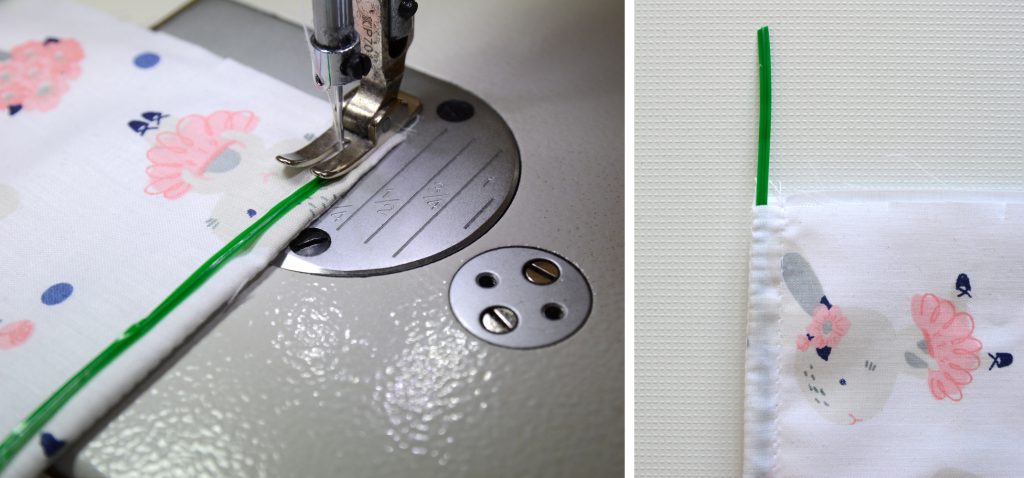
4. ADD A WIRE AT THE NOSE
The upper part of the mask should be wired so that it can be snugly fitted to the nose. It’s not only about aesthetic issues or convenience – if you sew masks for nurses, they will appreciate this little wire, because thanks to it they won’t have to worry about steamy goggles.
You can use any wire you find at home. We use the florist wire because it is soft, coated with an additional layer of tape and it doesn’t need any further processing. Our wire is 17 cm long, so it corresponds exactly to the width of the mask.
You can use any wire you find at home. We use the florist wire because it is soft, coated with an additional layer of tape and it doesn’t need any further processing. Our wire is 17 cm long, so it corresponds exactly to the width of the mask.
5. MAKE OVERLAPS
Before you make overlaps, stitch both hems of the mask – thanks to this, the layers of fabric will not move.
To make even overlaps, fold the hems of the mask according to the cuts. You should get 3 overlaps, as shown in the photo below. Stitch them and then iron the whole mask:

6. ATTACH STRAPS
Fold each strap in half and then put them to the center of the mask (as in the picture) – you can help yourself with pins. Then fold over one edge of the strap to the inside and sew it with a straight stitch. When you get to the mask, don’t break the stitch, just stitch the whole thing to the end. Do the same with the second strap:

7. IRON – AND IT’S READY!
The mask is ready! Just cut off the unnecessary threads, iron – and start sewing the next one .

Once you have your mask ready, it is good to sanitize it properly. Here you will need the instruction presented in the next step:
How to wash and sanitize a face mask
You can wash and sanitize the face mask in two ways:
1. Regular washing
In this variant you put the mask into the washing machine and set the laundry at a temperature not lower than 60°C (140°F). This method works mainly when we use the mask rarely and we can wash it together with other things that require high washing temperatures (for example, bedding). However, when we use the mask more often and we need a faster sanitizing method, we can use the method no. 2:
2. Washing the mask by hand and pouring boiling water all over it
Wash the mask by hand using a detergent and water in such a way that all dirt (e.g. dust) is removed from it. After the initial hand washing, rinse the mask thoroughly, then put it into a clean bowl and pour boiling water over it.
Although the mask can be dried in any way, we don’t recommend drying it flat – for example on a radiator. Remember that putting a sanitized mask on a non-sterile (and often simply dusty) surface is completely pointless. It is much better to hang the mask to dry so that it doesn’t touch anything.
When the mask is already dry, don’t forget about the final stage of sanitizing – ironing. The cotton mask should be carefully ironed at the maximum temperature that the doesn’t damage the fabric (we usually iron cotton at a temperature of 150-180 °C).
How to put on and remove a face mask
When the mask is washed, ironed and ready to use, remember how you should put it on and take it off. The instructions on how to put on a mask are as important as the instructions on how to sew the mask.
The main rule of putting the mask on is: always do it with clean, sanitized hands. If you use filters, carefully slip them inside. Then, with clean hands put the mask on your face and tie the straps at the back of the head – first the upper, then the lower ones.
You should put on the mask only when you really need it, for example while shopping. Don’t wear it at home (we know it might sound tempting, though :)). The recommended time of wearing a reusable face mask is about half an hour – up to two hours, but if you feel the mask is getting wet, you must take it off or change it.
Taking the mask off properly is just as important as putting it on. Remember that if you do it the wrong way, you can put on your face everything that the mask was supposed to protect you from. To avoid this, carefully untie the mask straps and, holding their ends, remove the mask from the face. Don’t touch anything with your hands, except the straps – especially the “main” part of the mask where all dirt has accumulated. Put the mask into the washing machine – and don’t forget to wash your hands thoroughly after that.


